
Article by Ben Griffis
Urawa Red Diamonds hosted Vissel Kobe for the second leg of the J.League Cup (Levain Cup) Playoff Round on June 13th. The clubs’ third match against each other in 3 weeks ended as a 2-2 stalemate after an entertaining match where both teams played quick passes on the ground and one-twos with relatively high lines. Both managers’ tactics were reminiscent of Pep Guardiola’s Barcelona, spearheaded by ex-Barcelona men Andrés Iniesta and Sergi Samper. Urawa Reds will move onto the Quarter Finals of Japan’s league cup after winning the first leg the week before 2-1 in Kōbe.
Urawa reds came into this match in a better run of form having not lost in the previous 9 matches in all competitions—including two victories against Vissel Kobe, one in the league and one in the first leg of this tie. Vissel Kobe’s previous 9 matches were not as successful, recording 3 wins, 3 draws, and 3 losses. Both teams sit on 28 points in the J1 League after 17 matches, with Vissel Kobe in 6th ahead of Urawa Reds because of goal difference.
Urawa Reds’ manager Ricardo Rodríguez and Vissel Kobe’s manager Atsuhiro Miura both lined their teams up in formations facilitating the smooth passes they played during the match. Both managers have employed variations of 4 defenders, 3 midfielders, and 3 attackers throughout this season without settling on one specific formation. Rodríguez lined up his team in a 4231 with Yoshio Koizumi sitting at the top of the midfield ahead of Atsuki Ito and Daiki Kaneko. Miura lined up in a classic 433, with former Barcelona man Andrés Iniesta and Hotaru Yamaguchi having a license to roam and swap positions while the midfielder at the base—another former Barcelona man, Sergi Samper—stayed deep and facilitated ball movement and recycling.

Urawa Red Diamonds Buildup and Attack
Urawa Reds had two buildup shapes throughout the match, with neither being used more frequently than the other. In one shape, both fullbacks pushed high and wide while the two central midfielders Ito and Kaneko stayed back and formed a square. In the other shape, which the figure below shows, right back Tomoya Ugajin would stay back and narrow, joining the midfielders as they shifted to the left. This created a W shape that facilitated passes between the back line and midfielders as Vissel Kobe pressed their buildup.
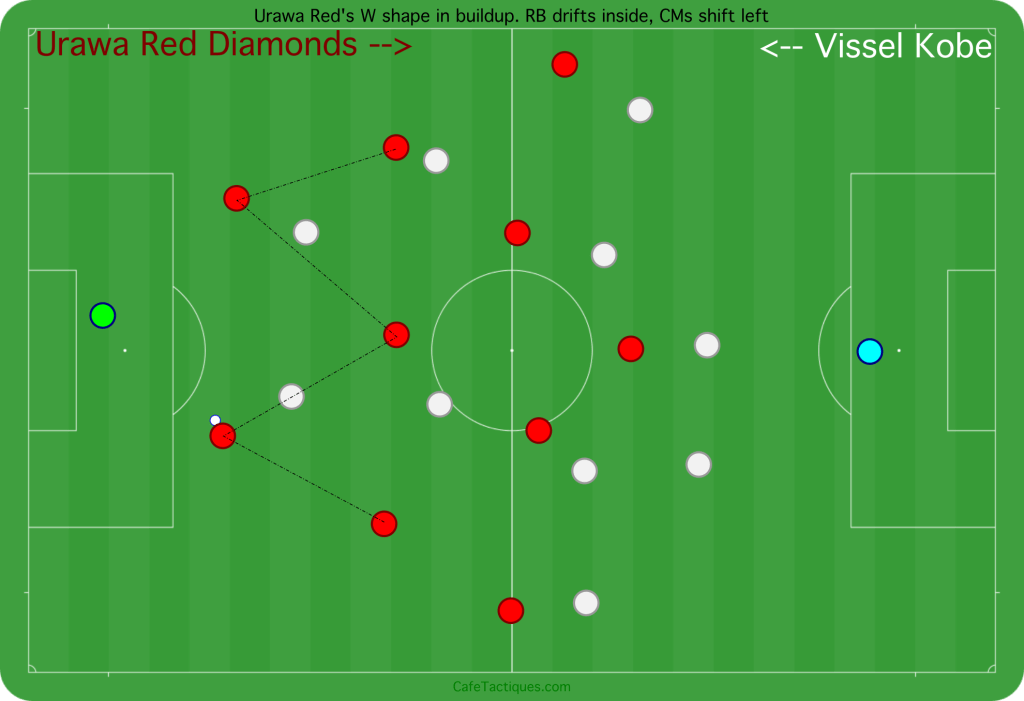
The left back and right winger gives this W shape its width, and the left winger coming inside allows Urawa Reds to form a diamond shape in midfield with the right central midfielder at the base and striker Kasper Junker at the head. This shape creates many diamonds that Urawa Reds can pass between, which is how they preferred to build up.
Vissel Kobe pressed at varying levels of intensity during the match, but Urawa Reds’ strong shape with an abundance of passing options from any position allowed them to successfully pass around their opponents. At times there were mistakes or poorly weighted passes, but their shape was successful at countering Vissel Kobe’s press.
Urawa Reds’ passes were mostly short and quick with lots of one-twos, but they also looked for medium and long switches when Vissel Kobe’s attackers and midfielders pressed and left open players on the other side of the pitch. Once the ball was out of Urawa Reds’ third, Ugajin would shift back out wide, creating a more normal 4231 attacking shape—high and wide fullbacks, striker and attacking midfielder down the middle, and wingers sitting in the half-spaces.
Urawa Reds never really sat back and spent aimless time on the ball just to waste time, even when they were leading by one goal on aggregate at the end of the match. Rodríguez sent his team out to play positive, attacking football, and they played that way for the full 90 minutes. They tried many dangerous passes to players in channels and into space, trying to cut out Vissel Kobe’s high line and pressure. Their attacks varied between crosses into the box and trying to pass into it from midfield, although they seemed to favor crosses more than Vissel Kobe.
Once Urawa Reds won the ball back in midfield, they countered with pace, but kept a sturdy shape rather than fluid movements that could leave players in unfamiliar positions if Vissel Kobe suddenly regained possession. Even at the end of the match when Urawa Reds only needed to see out the game to go through on aggregate, they continued to counter when winning the ball.
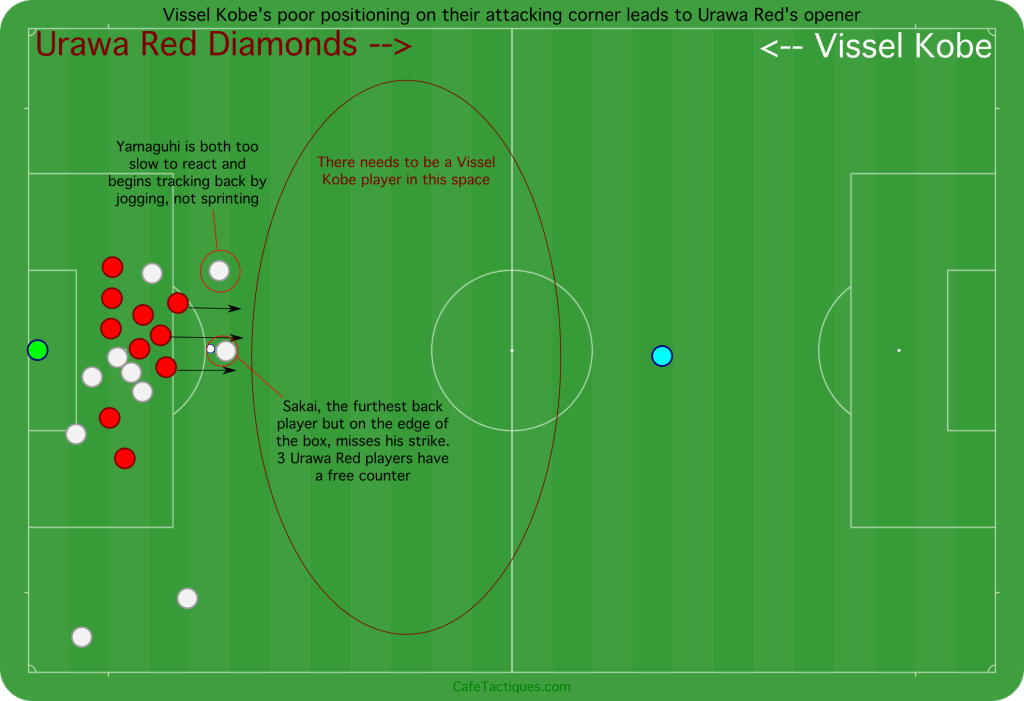
A swift counter after a corner led to Koizumi’s opening goal. Urawa Reds countered with three players after Vissel Kobe’s Gotoku Sakai missed the ball at the edge of the box. Junker, Koizumi, and Yuruki had an open break because Sakai was the furthest back player for Vissel Kobe. Even though Sakai recovered enough to get a challenge in on Koizumi, it wasn’t effective enough to stop the counter. Junker ran at the goalkeeper Maekawa before passing across to Koizumi for an easy finish.
Urawa Reds’ second goal also came off a counter, but this time in open play. Vissel Kobe lost the ball in Urawa Reds’ box and Ugajin noticed their high line. Ugajin played a ball up to Junker at midfield, who outpaced Kobayashi and chipped Maekawa, who was far off his line and struggling to get back into position.
The biggest weakness in Urawa Reds’ attack was poor decisions at the end of a phase. Whether it was a poor pass decision at the edge of the box or taking a shot when passing was the better option, a few attacks ended when they should have continued for one or two more passes to get a better chance. Further, when Urawa Reds had sustained possession further up the pitch, their back line was high enough that one well-placed counter-attacking long ball from Vissel Kobe could have caused problems, similar to how Urawa Reds scored their second goal. Luckily for Ricardo Rodríguez’s side, however, Vissel Kobe were not looking for long balls on the counter, opting for shorter passes and possession.
Urawa Red Diamonds Defense
Urawa Reds defended in a 442 or 4411 shape, depending on where Yoshio Koizumi was. Koizumi marked Samper and followed him as he dropped between the center backs, forming a 442 next to Junker as the wingers Sekine and Yuruki sat deep. The shape was closer to a 4411 in the second half when Samper sat in front of the center backs. There were two interesting patterns to Koizumi’s tracking of Samper.
First, Koizumi rarely pressed Samper directly and allowed him to have time on the ball behind the center backs. Second, Koizumi rarely moved far ahead of Junker, instead stopping in line with him to form a 442. It looks like Rodríguez’s plan with Koizumi was to force Samper to play passes instead of running with the ball. Given that Iniesta, Yamaguchi and Vissel Kobe’s fullbacks were high up the pitch, Koizumi and Junker formed a wall that stopped Samper from running too far with the ball. Samper was forced into longer passes which, even as a good passer, have a chance at being intercepted.
Once the ball left Samper, Urawa Reds pressed high with their attackers and midfielders. Every time a Vissel Kobe player received the ball, the closest Urawa Reds player would rush to close them down, making a challenge if they believed they had a good chance of winning the ball. However, this pressure opened up longer balls across the pitch for Vissel Kobe similar to how Urawa Reds switched play when Vissel Kobe pressed—the game was a mirror image at times.
Urawa Reds kept a relatively high line, but it was cautiously high instead of dangerous, even if there was room behind the center backs for potential Vissel Kobe counters (which never really came). Makino and Deng pushed up in possession, but were ever wary of quick counter attacks and didn’t venture too high up. They also stayed a little further back out of possession and were more hesitant to push and press Vissel Kobe players too soon. Urawa Reds’ more reserved use of their center backs in the midfield third—especially compared to Vissel Kobe—highlights this aspect of their play.
Vissel Kobe’s first goal came because of poor marking by Thomas Deng and a mistake from Tomoaki Makino. Sakai sent in a great cross to Douglas after Samper switched play to the right flank. Deng didn’t track Douglas’ initial run, but he was the player who should have stayed close to the opposing striker. Makino also made a mistake by not reading the ball’s flight and getting stuck flat-footed as Sakai crossed. Deng didn’t track Douglas and Makino couldn’t reach the ball, so Douglas had a free header to put past Nishikawa, who did well to get a hand on it.
One major weakness for Urawa Reds’ defense was their inability to cope with Iniesta’s vertical balls between lines. Iniesta, whether in the midfield or final third, was able to find teammates running behind the defense or in a small pocket of space with inch-perfect passes. To counter this in the second half, Urawa Red players started challenging Iniesta harder and more frequently, instead of only challenging when they felt they could win the ball. This resulted in several fouls on Iniesta in midfield.
While Iniesta was the player targeted most often, Urawa Reds fouled all Vissel Kobe players more in the second half. Iniesta’s goal came from a free kick given away by Sekine for a poor challenge on Daiju Sasaki on the edge of the box—not a location to give away a free kick when Andrés Iniesta is in the other team. Iniesta went around the wall to the far post instead of over the wall, as Nishikawa thought. Nishikawa cheated to his right, and Iniesta scored in the top corner to his left after a perfect strike. While Nishikawa and the wall couldn’t have done much, the Sekine shouldn’t have fouled Sasaki to give Iniesta the chance to score.
Vissel Kobe Buildup and Attack
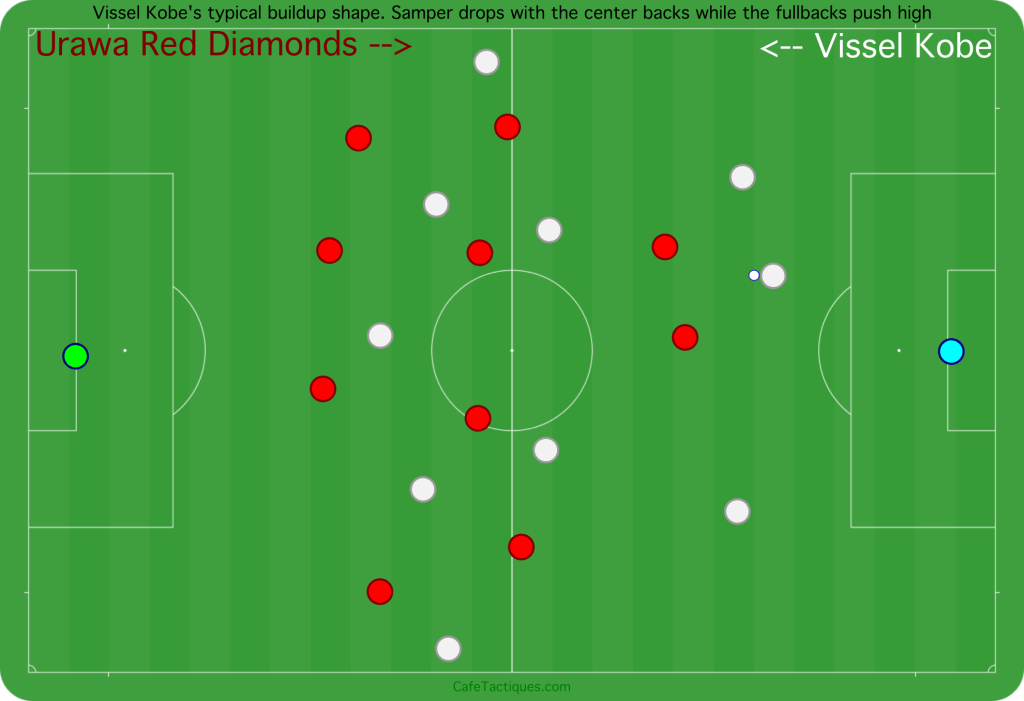
Atsuhiro Miura used different but similar shapes to build up with in each half. In the first half, Sergi Samper dropped behind Yuki Kobayashi and Ryuho Kikuchi and acted as a playmaking sweeper like Ronald Koeman at Barcelona in the early 1990s. The fullbacks were very high and wide while the wingers tucked in toward the midfield. Iniesta and Yamaguchi were free to roam, find space, and rotate, but Iniesta was typically on the left side of the pitch and Yamaguchi stayed more central on the right.
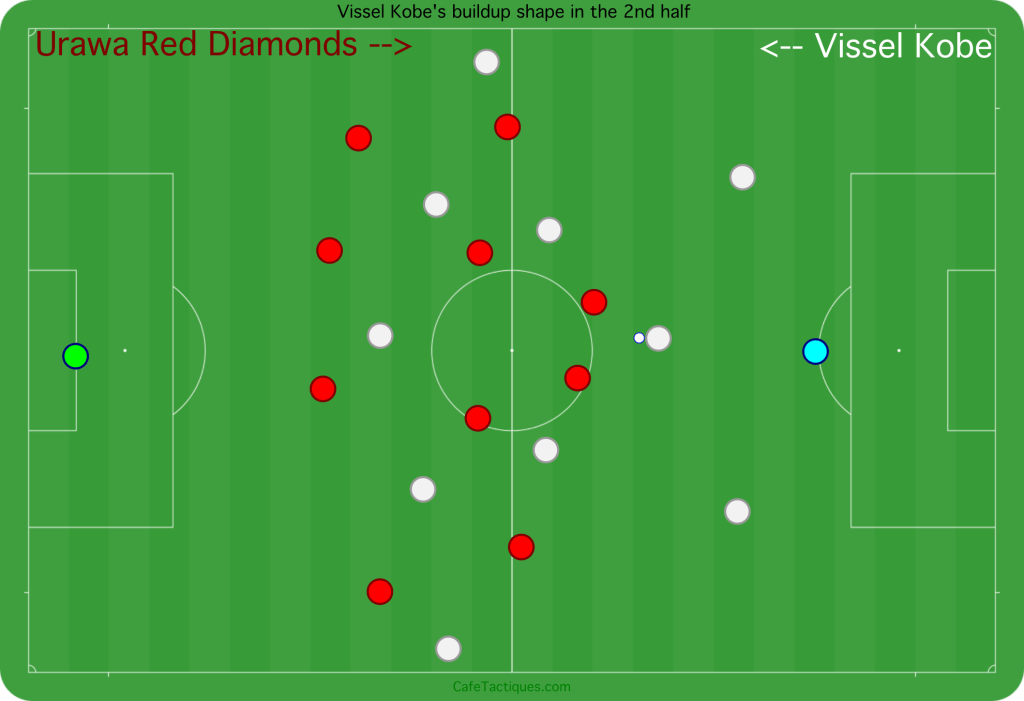
In the second half, Miura instructed Samper to sit higher and not drop between the center backs. Maekawa also pushed slightly higher and passed between Kikuchi and Kobayashi more often than the first half. The other players remained in similar positions as the first half. This tweak allowed Samper to play shorter balls to the midfielders or fullbacks and didn’t create as large of a gap between the defensive and midfield line in buildup. Sakai also shifted over to left back midway through the second half when Masika came on and slotted in at right back.
When the ball moved into the final third, Iniesta acted as an attacking midfielder with freedom to move onto either wing, while Samper pushed up and joined Yamaguchi in staying further back for cleaning up and quelling any counters.
Vissel Kobe used many one-twos to move the ball around Urawa Red’s press. Even though both teams played many short passes on the ground and switched play when necessary, Vissel Kobe was slightly more apprehensive to play longer balls. Vissel Kobe opted to use Iniesta’s passing and movement to get around the press, instead of playing lots of balls out to Sakai—most of Vissel Kobe’s buildup and midfield play was on the left.
Vissel Kobe had 2 main attacking patterns in the final third. One was to use vertical passes from Iniesta, Yamaguchi, Sasaki, or Samper to a player running behind the defense into the box or on the wing. The second pattern involved getting the ball out to an open fullback on the wing via a longer pass. The fullbacks would then aim crosses at Douglas or Lincoln while they were on the pitch, or at the attacker in the best position after both big strikers had come off.
While Vissel Kobe’s vertical balls and one-twos at the edge of the box created several chances, the attackers weren’t clinical with them. Had they been clinical, the match would have ended with 3 or 4 Vissel Kobe goals and they would be through to the Quarter Finals.
Vissel Kobe’s open play goal came from a cross after switching to a wide open Gotoku Sakai, however. Yamaguchi received the ball from Samper at the edge of the box—possibly intercepting a ball meant for Yuta Goke—and returned it back to Samper. Samper then swings it out wide to Sakai, who has ample time to pick out Douglas making a run into the box.
While being strong passers throughout the match, one of Vissel Kobe’s biggest weaknesses in attack was their tendency to pass and play their way out of trouble instead of opting for a long pass. Several times, Urawa Reds forced mistakes from Vissel Kobe players who were insistent on passing out of a successful press. Further, Vissel Kobe’s high line in the attacking phase of the game left them open to counters, one of which ended in Kasper Junker’s goal.
Finally, while Iniesta was one of the best players on the pitch, Vissel Kobe relied on him to create most of their chances. While Yamaguchi’s dribbles and Samper’s passes were also effective at creating chances, most players looked for Iniesta when making a pass. Urawa Reds players were aware of this and placed players close to Iniesta at all times. Even though Iniesta could pass around his markers, it was a risky tactic to rely on and Vissel Kobe were lucky that Iniesta didn’t have an off night or many errors, or else there would have been even more Urawa counters.
Vissel Kobe Defense
Vissel Kobe defended in their 433 shape, but it was relatively fluid and became a 4222 or a 424 in Urawa Red’s W-shaped buildup. Iniesta pressed from the left wing fairly often, while Sasaki moved centrally next to Douglas and Goke pressed players on the right wing. The fullbacks sat a little higher during Urawa Reds’ buildup to enable quicker pressing of the opposing fullback/winger when they received possession. You can see Vissel Kobe’s 4222 shape in the figure below.
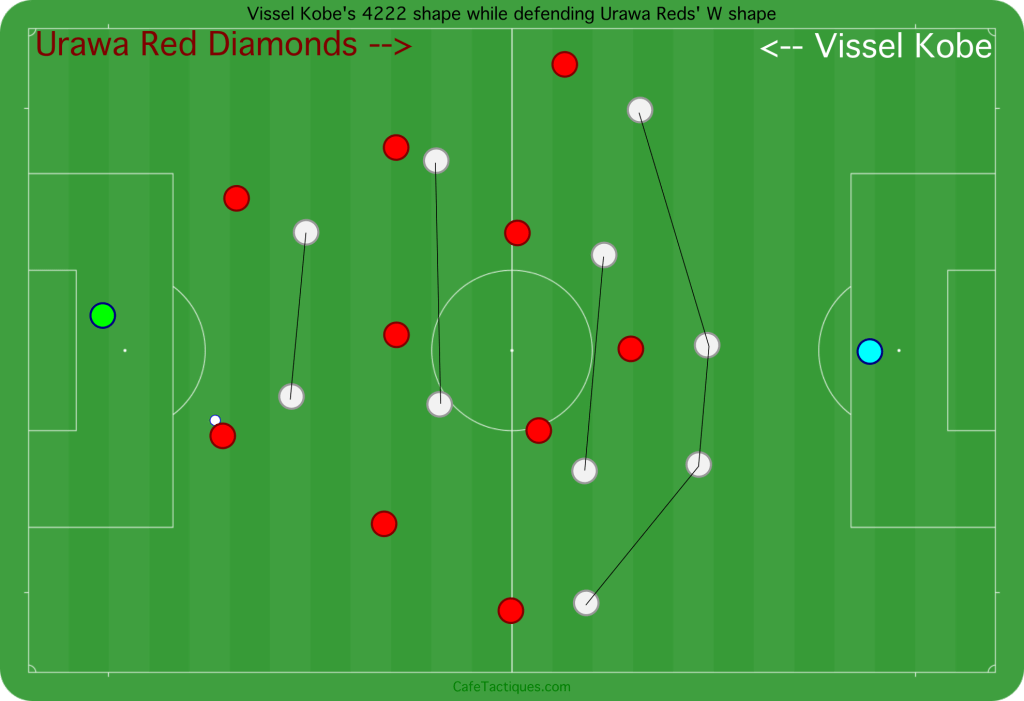
This shape, as well as a 424 or 433 when they defended more compactly, facilitated Vissel Kobe’s press. You can see in the figure above that, while Urawa Red players on the wings might have some space, there is always a Vissel Kobe player close enough to press them as they receive the ball.
Vissel Kobe defended with a high line—almost too high as they had to defend multiple counter attacks. Urawa Red’s second goal came from a counter attack over Vissel Kobe’s high line, aided by Maekawa being far off his line as well. While a high line can complement pressuring an opponent, players have to recognize when to drop back. When Vissel Kobe loses the ball in the box, the defenders should start dropping back, instead of waiting until a ball is played. Maekawa should have also been further towards his goal. He wasn’t rushing out to close down Junker, but sprinting back the entire way—he was dangerously high in possession and got caught out on the counter.
Urawa Red’s first goal also resulted from Vissel Kobe players sitting too high up, albeit on a corner instead of open play. Gotoku Sakai was the furthest man back, but he was at the top of the box. When the ball popped up after being half-cleared, he tried to shoot on the volley. However, he missed the ball, and it went past him. 3 Urawa Red players countered and picked up the ball, while Hotaru Yamaguchi slowly reacted and then started jogging back instead of sprinting. Yamaguchi only started sprinting when Sakai’s challenge wasn’t effective. Had Yamaguchi sprinted from the start, he may have caught up with the opposition, as he came close at the end.
Sakai should not have been so high up when he was the last man back. On a corner kick, especially early in the match, Vissel Kobe needed at least one player in the backfield precisely for this reason—one mistake leads to a counter. This goal is summarized in the figure below.
Overall, Vissel Kobe’s main defensive weakness was their high line. Too many times they were caught out in transition and had difficulties recovering. Both goals against them came from having too many players up the pitch and too few back.
Final Thoughts
Urawa Red Diamonds and Vissel Kobe played a very similar and very equal game in the second leg of the J.League Cup Playoff Round. The game was aesthetically and tactically entertaining, with both teams employing a quick passing style with consistent pressing. It was an open, positive, attacking game that lived up to the knockout nature of the match. Both teams played vertical balls and exhibited shades of Barcelona even though only Vissel Kobe had ex-Barça players on the pitch.
Urawa Red’s 2-1 first leg victory in Kōbe propelled them to the Prime Stage (quarter finals) after this stalemate in Saitama. Both teams came into the match on 28 points in the J1 League and they showed their equal quality in this entertaining match. Urawa Red Diamonds go through 4-3 on aggregate, but they will have a long wait until their next game in this competition—the quarter finals first leg is set to be played on September 1st.
Urawa Komaba Stadium in Saitama, where the match was played.
